How To Fix “Error Establishing A Database Connection” In WordPress

You type in your website’s URL… but what greets you isn’t your familiar home page.
Instead, it’s a blank screen. No matter what link you try, everything’s missing, except for the ominous words:
“Error establishing a database connection.”
The longer your website is down, the more traffic you’ll lose. And that could mean lost subscribers, lost customers, and ultimately lost revenue.
But what exactly does that error even mean? And more importantly, how can you fix it and get your website back to normal as soon as possible?
In this article, we’ll go over exactly what the error message means and what could be causing it, and then I’ll walk you through some steps to troubleshooting and fixing the problem.
(Want to skip the analysis and start troubleshooting? Just click here to skip ahead.)
What Does “Error Establishing a Database Connection” Mean?
First, let’s take a look at how WordPress works to display your website, and it’ll become clear why this error is so devastating.
The WordPress software is written using PHP and MySQL. Why two languages? Because all the information that makes up your website is stored in a MySQL database, and WordPress uses PHP to store and retrieve information from that database.
Generally, whenever a page is loaded on your website, it’s built on-the-fly. PHP code is used to access your MySQL database and retrieve every bit of information needed to create the page. There’s a PHP query to access the post title, another to grab the author name, another to retrieve the publication date, and so on.
Back to your error message: “Error establishing a database connection.” This means that for some reason the PHP code was unable to connect with your MySQL database to retrieve the information it needs to build that page.
That’s why this error is often all you see on an otherwise blank page. If you can’t connect to your database, there’s no way to know what to display; no information about your website is available.
What Causes This Error?
While the meaning of the error message is clear, the reasons behind its occurrence often aren’t.
There are many reasons why your website could be having trouble connecting to your database, but they generally fall into three categories:
- Your login credentials for your database are wrong. Your database uses separate login credentials (username and password). If those credentials have recently been changed, your website won’t be able to access the database with the old credentials.
- Your database is corrupted. Any number of things could cause your WordPress database to become corrupted, from uploading a bad plugin, to lightning strikes to the server (seriously — though luckily that isn’t too common).
- The server that hosts your database is down. Your database’s server may be down due to a problem or error on the part of your web hosting company, or you could be experiencing a big traffic spike that your server just couldn’t handle.
So with all these possibilities, how can you narrow down the problem and fix it?
Troubleshooting “Error Establishing a Database Connection”
1. Determine where the error is occurring
Can you see your website normally, but get the error when trying to access wp-admin? Or maybe your website is down, but you’re getting a slightly different error when you try to login: “One or more database tables are unavailable. The database may need to be repaired.”
These are signs of database corruption.
WordPress has a built-in way to attempt to repair your database, but you’ll have to enable this feature first. To do so, you’ll need to access your wp-config.php file, which contains your WordPress installation settings and configuration.
You can find wp-config in the your root WordPress file directory. You can access it by logging into your cPanel, selecting File Manager, and navigating to the folder where you installed WordPress.
Once you have wp-config open, add this line of code to the bottom:
define( 'WP_ALLOW_REPAIR', true ); |
This line will enable you to optimize and repair your database by navigating to www.yourwebsite.com/wp-admin/maint/repair.php (just replace “yourwebsite.com” with your actual URL).
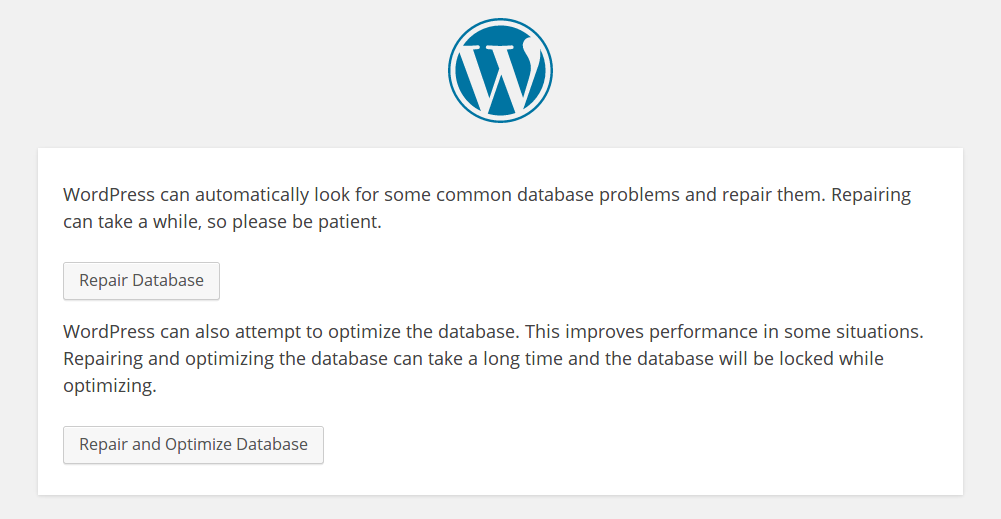
You should see the above screen with two options to repair, or repair and optimize, your database. Feel free to choose either; just note that optimizing will take longer.
Please note that this database repair page is not secure; anyone can access that URL without having to login. Once you’re done repairing your database, be sure to remove the line of code you added to wp-config. This will disable access to the repair page and prevent anyone else from messing with your database.
(Just as a side note, there are other ways available to repair and optimize your WordPress database, including via PHPMyAdmin in cPanel. I wrote a bit about it here: Cleaning Up Your WordPress Database To Optimize Your Website’s Performance)
Keep wp-config open for now until you’re certain the error is resolved and your website is working again. If you’re still getting the same error message, you’ll need wp-config open for the next step.
If this doesn’t apply to you, or if it didn’t work, move on to the next step to continue troubleshooting.
2. Check your database login settings in wp-config
If the above step didn’t work or didn’t apply to you, then the next thing you can do is take a look at your database settings in your wp-config file.
Wondering how your database login credentials could have suddently stopped working? Things like switching hosting companies or changing anything about your database name or user information could cause the error if your wp-config file wasn’t updated to the new information.
You may still have the wp-config file open from the last step. If not, log into your host’s cPanel and open the File Manager. Navigate to the directory where you installed WordPress, and look for a file called wp-config.php. Go ahead and open that for editing.
You’ll see the login credentials for your database, probably near the top of the file. It should look something like this:
// ** MySQL settings - You can get this info from your web host ** // |
/** The name of the database for WordPress */ |
define( 'DB_NAME', 'database_name_here' ); |
/** MySQL database username */ |
define( 'DB_USER', 'username_here' ); |
/** MySQL database password */ |
define( 'DB_PASSWORD', 'password_here' ); |
/** MySQL hostname */ |
define( 'DB_HOST', 'localhost' ); |
As you can see, there are four pieces of information WordPress needs to access your database:
- The name of the database (“DB_NAME”)
- The login username (“DB_USER”)
- The login password (“DB_PASSWORD”)
- The database host (“DB_HOST”)
If any one of these values is incorrect, WordPress will not be able to connect to the database.
One way to check on your database outside of WordPress is by using PHPMyAdmin, a tool for accessing and editing MySQL databases. PHPMyAdmin is included with most hosting plans, and you can find it in your cPanel dashboard.
Warning: Be very careful using PHPMyAdmin, since you’ll be dealing directly with your site’s database.
Once you’ve logged in to PHPMyAdmin, you will see a list of databases on your server in the left-hand column. Click on the one that matches the name in your wp-config file (it will be the value after DB_NAME, where it says “database_name_here” in the above sample code).
(Don’t see any databases? Contact your hosting company, since the entire problem may be an issue with your server.)
After clicking on your database name, you’ll see the main screen populate with the names of the tables in your database. To make sure this is the correct database, you can find the table named “wp_options” and click on the ‘Browse” option next to it. You should see your website’s name, URL, and your other general settings here. Now you know whether or not you have the correct database name in your wp-config file. If it’s not correct, go ahead and fix it in wp-config.
Now let’s check on the username and password.
There are a few ways to do this, some more convoluted than others. I’ll give you two options.
- You can either create a simple .php file to test whether you are able to connect to your database with the credentials in your wp-config file, or
- You can just create a new user and password, and update your wp-config file with the new info. You’ll have to do this if #1 fails, so you might just want to skip to this step.
Option 1: Test your existing credentials.
Create a file in your WordPress directory called something like testconnection.php (the name doesn’t matter; just the .php extension). Paste the following code:
<?php |
$test Connection = mysql_connect('localhost', 'root', 'password'); |
if (!$testConnection) { |
die('Error: ' . mysql_error()); |
} |
echo 'Database connection working!'; |
mysql_close($testConnection); |
?> |
Once you’ve created that file, just navigate to the URL of the file in your browser (e.g. your site.com/testconnection.php). You’ll see either a successful connection message, or an error with more details.
If the username and password isn’t working, we can just create a new one.
Option 2: Create a new database user and password.
We can do that using a different tool available in cPanel called “MySQL® Databases.” Go ahead and click on that, then scroll down to the heading: MySQL Users: Add New User.” Choose a username and strong password, and make note of them for your wp-config file. Click “Create User.” Now scroll down to the heading “Add User To Database,” and choose your new username and your WordPress database, and click “Add.” Update your wp-config file with the new username and password.
Now your database name, username, and password are all correct. That just leaves DB_HOST.
In most cases, this value will be “localhost,” but it depends on your host’s settings. WordPress has a list of common hosts with their DB_HOST values on their website. If your host isn’t listed there, you can contact your hosting company to ask what value to use.
3. Still getting the error message? Check with your hosting company
If you’ve followed the above troubleshooting steps and your website is still down, it could be a problem on your host’s end. Contact your web hosting company’s support and give them all the details of the error and the troubleshooting actions you’ve taken, and they may be able to help you determine the cause of the error.