If there’s one often overlooked aspect of deploying a website, it’s email delivery. Sure, you take into account your website bandwidth, DNS, server performance, etc… But email always seems to come low on the totem pole. I suppose this might be due to the fact that it’s ubiquitous. You use it every single day and never really think about all messy underpinnings of it. And, yes, email as it is today is pretty much a mess… I like to think of email as a throw-back to a simpler, more wholesome time when people actually trusted each other. A time before messages from Nigerian princes and bogus pharmaceutical ads filled your inbox. Sadly, those days are gone and the once simple and elegant SMTP protocol now includes a huge pile of kludges and baggage that must be dealt with, such as:
- SPF records
- DKIM
- RBLs
- IP address reputation
- Mail server management
- Reverse DNS pointers
- Spam Filters
- Sending Limits
- Weak Passwords
When you think about it, it’s miracle that it works at all. Or perhaps it’s a testament to the resiliency of the original email spec, that it continues to chug along in spite of all the abuse that occurs. I figure it’s probably a bit of both.
As an email user, you never really have to think about any of the above, but as a website owner, you absolutely must! As your site grows, you will undoubtedly need to send vast quantities of email of some kind or another – transactional emails, news letters, whatever. Unfortunately, sending large volumes of email can be a real pain. Web hosts and ISPs are typically not too keen on their customers sending massive amounts of email. Shared hosts usually limit the number of outbound email you can send per hour. Or maybe your site is on a dedicated server and mail is routed through a smarthost, which limits the maximum amount of email you can send per day. Ultimately, sending large volumes of legitimate email can be a complex challenge that requires a lot of forethought.
Luckily, there are plenty of mail delivery services out there that do a lot of the leg work for you, freeing you from many of the finer points of email deliverability. If you’re an AWS customer, one such service is Amazon’s SES (Simple Email Service)
Amazon SES
SES is an outbound only email sending service that Amazon provides. With SES, you get to leverage Amazon’s massive infrastructure, IP reputation, and affordability to send large volumes of email (up to 10,000 emails per day to start with) Setting up SES is fairly simple, there are just a few steps you have to complete.
First, you’ll need to verify any domain names that you’ll be sending email from. You can do this from within the AWS console under Services > SES.
To verify an entire domain, you’ll need to click the Verify New Domain button, enter the domain name. From here, you’ll be able to generate a DKIM (DomainKeys Identified Mail) that you’ll need to add as a txt record to your DNS zone. Once this is done, Amazon will check that DKIM record exists for your domain, and your domain will then be verified.
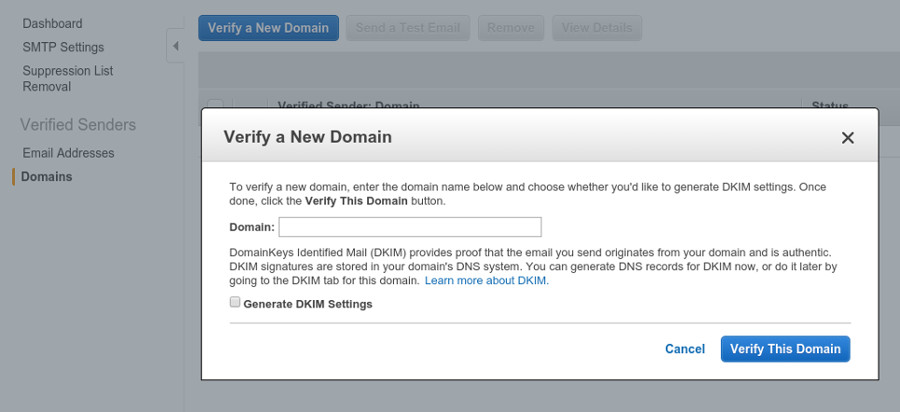
Verify all domains you want to send mail from.
After the domain is verified, you’ll have limited “sandbox” access to SES from which you can test things out. From the sandbox, you’ll only be able to send a limited amount of email to only the recipients you specify.
After you kick the tires in the sandbox environment, you’ll want to request full fledged “Production Access” from Amazon. This entails filling out a form that asks you a few details about yourself and how you’re planning to utilize SES. After someone at Amazon reviews your request, they’ll grant you production access if you comply with their requirements.
SES offers a few more really nice benefits, such as:
- Content filtering technologies to block any viruses, malware, or spam you might inadvertently send
- Complaint feedback loops with major ISPs
- Nifty sending statistics that show how many succesful, rejected, bounces, and complaints there were.
- Notifications to alert you of any complaints or bounces
You can read the full documentation here, and it’s also worth checking out their excellent “best practices” guide.
So, once you’re setup with SES, how exactly do you integrate it into your website? Amazon provides access either via SMTP or via their API. However, my thought is that it’s better to just let the operating system handle email through traditional means such as sendmail or postfix. In the remainder of this post, I will walk through setting up an ec2 instance running Ubuntu Linux 14.04 to route mail through SES.
Configure Ubuntu Linux 14.04 to send email via SES
Configuring SES at the OS level gives us the advantage that any service on the server can send mail as usual. For example, it would be nice to be able to send mail from shell scripts, the command line, various php scripts through the mail() function, etc. E.g all mail is handled in the usual fashion and it automatically gets routed through SES.
So, assuming that you’re running an Ubuntu 14.04 ec2 instance and would like all mail from the server to be sent out using SES, we’ll first need get our SMTP credentials from the SES console. After clicking the “Create My SMTP Credentials,” you’ll have the option to download them. Keep these safe.
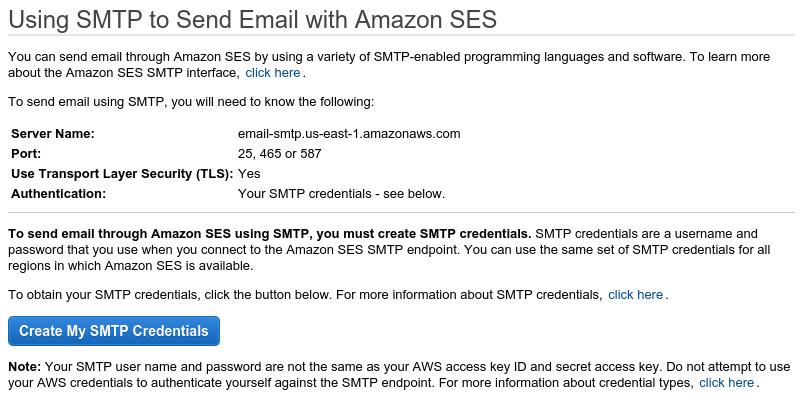
Create SES SMTP credentials
Next we’ll need to install a mail transfer agent, such as postfix.
|
1
|
sudo apt–get install postfix mailutils
|
After postfix installs, you’ll be presented with a configuration dialog asking you a couple questions.
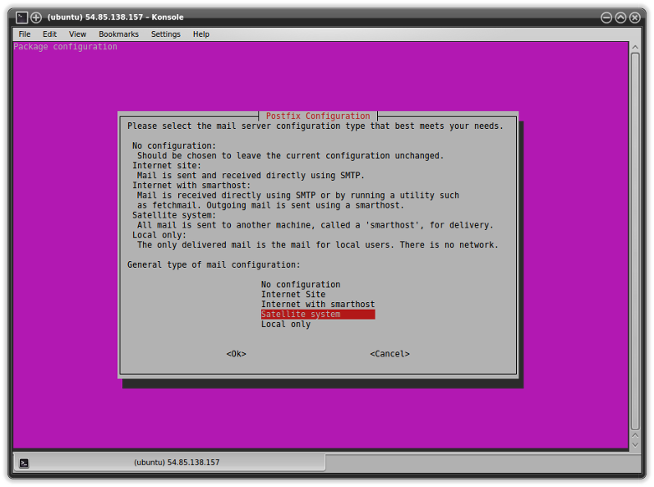
First, it will want to know the “General type of mail configuration.” Since we’re only interested in sending email from the server, and since we’re using an external SMTP server, select Satellite system
Next, it will want to know the mailname. For this you’ll want to enter your hostname, E.g example.com
Finally, the configuration dialog will ask for the SMTP relay host. For this, you’ll want to enter the SES smtp host and port from your SES console. E.g email-smtp.us-east-1.amazonaws.com:25
Next, we’ll need to edit the postfix configuration file and append the lines below:
|
1
2
3
4
5
6
7
8
9
|
sudo vi /etc/postfix/main.cf
smtp_sasl_auth_enable = yes
smtp_sasl_security_options = noanonymous
smtp_sasl_password_maps = hash:/etc/postfix/sasl_passwd
smtp_use_tls = yes
smtp_tls_security_level = encrypt
smtp_tls_note_starttls_offer = yes
smtp_tls_CAfile = /etc/ssl/certs/ca–certificates.crt
|
Next, we’ll need to set up the SES credentials in the file /etc/postfix/sasl_passwd
Add the credentials to the file (Replace user and password with your SES credentials)
|
1
|
email–smtp.us–east–1.amazonaws.com:25 user:password
|
Since this file contains credentials, let’s change it’s permissions so that it’s only readable by root.
|
1
2
|
sudo chown root:root /etc/postfix/sasl_passwd
sudo chmod 0600 /etc/postfix/sasl_passwd
|
Next, we need to create a hashmap database from the file containing the SES credentials, so execute the command:
|
1
|
sudo postmap hash:/etc/postfix/sasl_passwd
|
Set some permssions on the hashmap db file
|
1
2
|
sudo chown root:root /etc/postfix/sasl_passwd.db
sudo chmod 0600 /etc/postfix/sasl_passwd.db
|
Next, we need to tell postfix where to find the CA certificate, which is needed to verify the SES server cert.
|
1
|
sudo postconf –e ‘smtp_tls_CAfile = /etc/ssl/certs/ca-certificates.crt’
|
Finally, restart postfix so that the new changes take effect.
|
1
|
sudo service postfix restart
|
If everything is configured properly, we should now be able to send an email directly from the command line of the Ubuntu server.
|
1
|
echo test | mail –s “test message” –a “From: you@yourwebsite.net” user@example.com
|
Now that postfix is configured, any service or script that sends mail on the server will be transparently routed through Amazon SES.
So, to recap: Amazon SES is an affordable way to send large volumes of email. It removes a lot complexity associated with email infrastructure. It gives you a robust set of tools and visualizations concerning all of your outgoing mail. In addition, it’s highly flexible and can be integrated fairly easily into your existing AWS setup.